The final step of the video making process is post-production and editing. I have a very extensive editing process including cutting and framing, adding letterboxing, speed ramping, mixing audio, cleaning up audio, adding foley, stabilizing footage, masking in transitions, animating and incorporating animation, color grading, exporting etc. Here are a few of the features of my Novikof editing process.
I first change the sequence settings of the project to align with the new version of Premiere Pro's smart exporting, so that when I am finished, all of the video can be compressed in less time.
Sequence Settings:
Now, changing the sequence settings will automatically, similar to clearing your video cache in other Adobe products like After Effects or Photoshop (which I have had to do many times, as working in many programs with many project open at once can necessitate), so just be sure to do this at the beginning of the
I have to either hit I and O on both sides of the full project when I am finished and ready to export and then hit "sequence" and "render in to out" or as I edit, be rendering pieces of the project. This way, when I export, I will check render previews and all of the previews of my video that I already rendered before exporting will simply copy over to the export, and the render time will be a lot shorter (thus using the smart export method).
There are other ways to lower export time:
1. Hitting option and the down arrow with all of your footage selected (be sure to unlink all video and audio tracks so that your audio won't get compressed and then some removed as it would be all on one track. However, this only is a good idea when you are not going to be going back and editing anything in the project later and when you don't have any effects like one video with a blend layer or lower opacity to reveal the one underneath it because it will remove all of those multilayer-dependent effects.
I learned a lot of these tips and tricks from these videos of YouTubers I respect and are subscribed to:
https://www.youtube.com/watch?v=Qi5i1ryF1aA&t=258s
https://www.youtube.com/watch?v=AT8sU0MyncA&t=202s
This does increase the file size, but I will just re-import the finished, large file into a new Premiere project and re-export without the smart exporting settings after that, using a codec that creates a smaller file (I will save as an H254 the second time, and Quicktime the first). Then I will delete the original. This way I have quick export times and smaller files.
Here I import and organize my files.
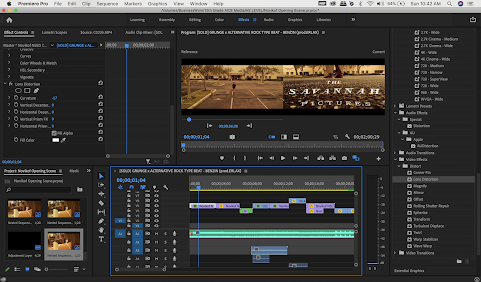
Here I bend back the fisheye lens to make the ground a straight line using the "lens distortion" effect.
When organizing my files, I copy them from the camera's SD card into a folder I create for the project in my external drive.
I used the unsharp mask to increase the "HD" look of the footage with lower quality from my drone. This blends the footage better between my drone camera and my 4K Sony Hand-cam camera.
I experienced software issues, where my GPU was not computing the masks I made very well, so I looked up what to do on the Adobe Support Community. I ended up having to uninstall
I wanted to create a smooth transition between these two shots, so made the first one with Garret's arm back on top of the shot at his waist.
I masked out the part where his arm had already passed over part of the shot so that it would reveal the waist shot underneath. I then keyed this mask's movement so it would move with his arm, creating a smooth transition.
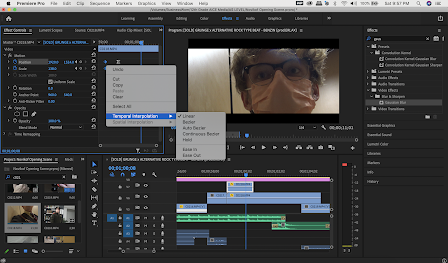
I made this shot blurry with a gaussian blur effect. This way, the shot would look like a POV from Garrett's eyes, which need glasses.
I then masked out the part of the gaussian blur where the glasses lens made Garrett's vision clear.
I keyed the mask's movement to go with the lens.
I changed the speed of this shot so Garrett would get to the guard in time for a slowed-down shot of the guard (to add emphasis and a menacing tone to that character) and so that the end of the shot would come at the end of the measure and beat in the score.
When I zoomed in on this shot, I was sure to ease the keyed movement in scaling and position. This was so that the movement was smoother and I did it using the temporal interpolation, clicking
"ease in" on the keys at the end of the pair and then "ease out" on the keys at the start of the pair.
I changed the blend layer of the shot with the circular light from the elevator button to "hard light," that the color could be seen clearly, but the darker parts would be more opaque, allowing Garretts face to be scene, implying that this was what he was thinking and that it illicit a strong reaction from him.
I changed the speed of the clip where Garrett breathes deeply to manipulate the timing with the audio from the flashback and the score. I could also change for just how long his breath took. His wearing a mask gave me even more control over this, as his mouth did not give away just when he was breathing.
I made a copy of this clip and reversed the speed of the second one before his breath. That way I could further increase the time before the breath and give more time for the flashback.
These two screenshots show my editing of the breathing foley. I was able to incorporate lighter breathing and the white noise of the elevator and the elevator's movement sounds into the audio clip by fading out some clips and blending them with others. I used the exponential fade and layering audio clips over each other very often.
Here I worked in Adobe Audition to try fixing some original foley I was saving for this project. I had accidentally applied a drone score behind the glitch sound effect for a different project, but I was unsuccessful as removing, no matter what tricks I tried. I ended up not using it. It was going to be a motif sound effect signaling flashbacks, but it was unnecessary to convey that the flashbacks were in fact within his head and not a strange shifting reality.
Here I am exporting a small portion of the full project (the keyed gaussian blur effect on the tracking/crab shot at the bookshelf) to watch over the effect more carefully than Adobe Premiere could play in back in real time within the program. The rendering power in the program was not strong enough, even if I lowered the playback quality to 1/16, it still lagged.
Here I was attempting to create a reveal and dissolve transition from the tracking/crab shot to the high angle down on Garrett with the book in the foreground, but it didn't look as good as a quick cut did, so I ended up removing this effect.
Here I am adding a lens flare and color correcting it to fit the shot. I made a mask around it to ensure no other part of the original asset got past the ultra keying or the changed blend layer meant to "cut it out" well.
Here I fade up from black on the first shot.
I also have to add the lens distortion to the second shot, as it is also taken from a drone and thus looks like it was shot with a fisheye lens.
I added a gaussian blur to the background that I masked in this shot as well. I keyed the movement of the mask.
These were many of the editing processes I went through for the Novikof film opening.


No comments:
Post a Comment